PiPS - the different π-Power-SwitchWelcome to the PiPS - a smart power switch based on the Raspberry Pi and REBOL. You can purchase an officially licensed bundle of the "PiPS-It!" management software at a price of €19.99 EUR only here. The software bundle already includes all necessary modules of the management software, which are required for a control center in your home automation based on the Raspberry Pi.
The software runs on all Raspberry Pi models, especially on the new Raspberry Pi 2 our software benefits from the additional computing power of the new multi-core architecture.
The hardware that is shown on the following photos are only for illustration and example as a PiPS can look like and how it is assembled. Please purchase the required hardware from the respective manufacturers or through their distribution channels. TGD-Consulting offers only IT services and software solutions. You want to make your own PiPS based on our "PiPS-It!" management software? Then purchase a license and read on to find out ... As a quick start you'll get here directly an answer to the most frequently asked questions:The term PiPS stands for π-Power-Switch and represents the extension of an ordinary multi-channel socket panel to a via web interface controllable 8x timer based on a Raspberry Pi and REBOL. PiPS enables control (on / off) of up to 7 electronic devices from a distance using a browser from any PC, tablet or smartphone. Find out live the ease of use and advantages of the π-Power-Switch and convince yourself right here and now on the Internet from the "PiPS-It!" management software and its simple operation and the extensive configuration options. Here you see a The system price of a PiPS including all required components is just about 100,- EUR. That figure already includes the cost for the license of the "PiPS-It!" management software. The version of the PiPS shown on this page consists of the following components:
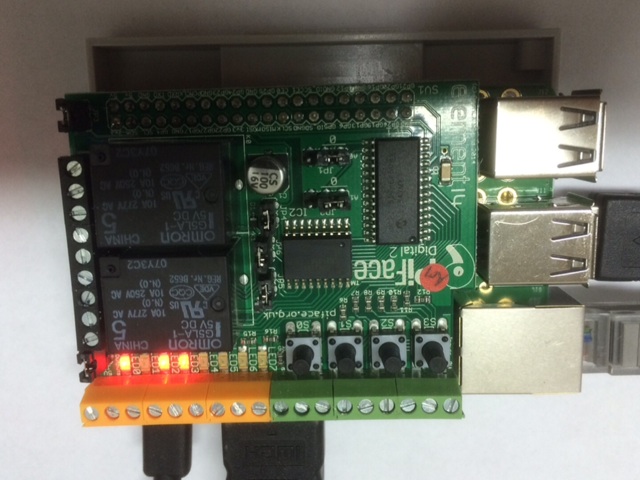
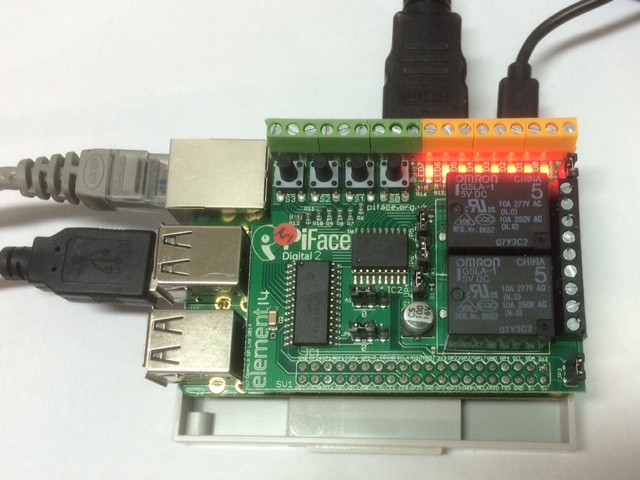
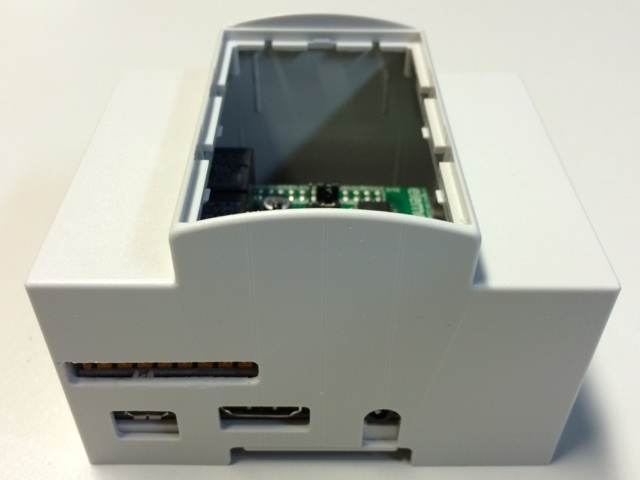
The external appearance of our prototype of the PiPS can hardly be distinguished from an ordinary power manager. As there's plenty of space in the power manager housing, it's easy to integrate a Raspberry Pi therein. The Raspberry Pi is hardly visible due to its black plastic housing. Each component of the PiPS can be single-handedly assembled by any ambitious users with a little skill. All parts can be ordered directly from the Internet. The sources of supply are partly linked in the above lists. We are using an old power manager made by Conrad Electronic Germany for our prototype of the PiPS, whose internals are easily extended by a Raspberry Pi and an 8-channel relay module. This enables you to create your own low-cost digitally controlled switching center. The inputs of the 8-channel relay module are connected to the GPIO interface (P1 row pinheader) of the Raspberry Pi. With the help of gpio (part of WiringPi) and the "PiPS-It!" management software the respective GPIO (0-7, WiringPi numbers) are activated. The outputs of the relay module themselves trigger the individual buttons of the power manager. The built-in optocoupler of the relay module provide a galvanic decoupling of the signals. Caution: Use a separate power supply for the Raspberry Pi and not the internal 5V supply voltage of the Power Manager! The housing of the Power Manager provides enough space for all components. When installing the components into the housing, short circuits should be avoided. In particular, when mounting the 8-channel relay module, make sure that no unwanted connections to live lines or ground arise. The Ethernet port and the USB ports on the Raspberry Pi (Model B) are freely accessible, so that the π-Power-Switch can be connected either via CAT cable or USB wireless adapter to your own LAN. At the moment our prototype of the PiPS looks from the inside like this: The central core of the PiPS is the "PiPS-It!" management software, which already includes the web server module. With the help of the web server module is PiPS-It! itself easily configured using a standard web browser. The web server module handles the entire communication and control. It also provides an additional status function ("... a nice gimmick ..."), which among other things records the temperature of the SOC of the Raspberry Pi for the last 10 hours and represents it as a temperature profile. Just click at the corresponding π at the bottom of the page and find out how warm it is about inside the PiPS. In addition to this gimmick the web server module also includes the essential functions of a timer. The time switch control supports daily switching times as well as weekly programs. Thus, all switching times can be set individually and exactly according to your requirements.
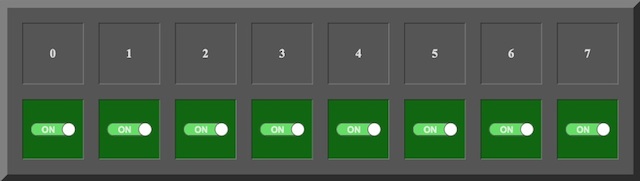
Besides the automatic switching times of the timers, the states of the 8 switches of PiPS can of course be changed manually. It should be noted here, that first you'll have to disable the corresponding timer before you manually set a switching state. Otherwise, the switch state will not last long until it's changed by the time switch control. An overview of the various configuration options can be seen in the following image. Note: By factory default the configuration interface (PiPS settings) is only reachable within the same network segment as the PiPS. If necessary, this can be adjusted according to your own security requirements. If no address for the Admin IP nor an IP range is specified, the π-Power-Switch is configurably from any IP address! Optionally, you can set the access control by an individual combination of user and password. Use the following link to purchase a license of "PiPS-It!" and to acquire the software itself. The license of the software bundle already includes the right to use the web server module. An additional license fee for the module is not necessary anymore. Nevertheless when needed you can also be purchase volume licensing of our software in addition to individual licenses for the web server module. Precise information on the prices or volume discounts for volume licensing are available upon request. Installation & Start: It's an amazingly simple setup. The software is delivered as a tarball, which only has to be unpacked (tar xvf PiPSIt.tar) and "PiPS-It!" management software is ready for use on the Raspberry Pi. By manually calling the shell script ./PiPSIt.sh start the PiPS-It! web server module on the Raspberry Pi is started. Of course, this script can also be used as an init script to start PiPS-It! automatically within the booting process of the system. But you can even run individually the PiPS-It! web server module as an alternative to the shell script. By entering ./bin/r3 Webserver.r & in the shell the web server module is started. However, we recommend the integration of the web server module as respawn process in the /etc/inittab . This offers the advantage that the web server module restarts each time it has been killed. Usage: As already mentioned above, the continued use and configuration of the PiPS-It! management software is amazingly simple. It is primarily done by using the browser on pc, tablets or smartphones. Simply enter the IP address of the Raspberry Pi in conjunction with the port of the web server module as an URL in the browser ( eg: http://192.168.0.100:8080 ) and go for it. Everything else is self-explanatory or reveals itself by itself. We hope you are just as convinced of the benefits of PiPS and from the smart design of the software as we are. If you have any questions, requests or suggestions for improving PiPS or the "PiPS-It!" management software, we are looking forward to your inquiry. You want to know more about our projects and other software? Then visit also these sites: | |||||||||||
- Copyright 2014-2023 by TGD-Consulting - PiPS powered by Serve-It! TNG - |